Guide: Build a Composable RAG Chatbot on your Docs
A step-by-step guide to creating a RAG chatbot on your documentation files using Langbase Pipes and Memory.
In this guide, we will create a RAG Chatbot on your documentation files and synchronize your documentation files with Langbase. This will enable you to:
- Build an AI question-answer chatbot on your documentation.
- Effortlessly upload and manage your documentation files as embeddings in Langbase Memory.
- Ensure very low hallucination in the responses due to the refined Pipe + Memory RAG system.
- Keep the RAG chatbot updated with the latest changes in your documentation.
We'll use BaseAI for creating the RAG pipe and memory. BaseAI will handle the memory and synchronize your GitHub documentation with Langbase to build a powerful chatbot on your docs.
To build a RAG agent on documentation files, we'll cover the following:
- Embed your documentation: Convert your documentation files into embeddings using Langbase Memory, which will serve as the agent's core knowledge base.
- Create a RAG pipe: Create a Langbase Pipe that taps into these memory embeddings to answer user queries accurately.
- Sync documentation updates: Set up sync for your memory embeddings with BaseAI so your agent always reflects the latest documentation.
- Build a chatbot web app: Connect the agent to a chatbot web app to interact with your documentation.
The RAG agent will help users answer questions by leveraging memory from embedded documentation files.
Let's dive in!
- Node.js and npm: Ensure you have Node.js and npm installed on your system.
- Langbase Account: Sign up at https://langbase.com.
- Repository with Documentation: A GitHub repository with your documentation files is required. BaseAI uses git commits to synchronize with your documentation changes.
Step #0
Navigate to the root of your documentation repository and create a new memory using BaseAI. Run the following command:
npx baseai@latest memory
This command will setup BaseAI and start the memory creation process by asking for name and description of the memory. Let's call it docs.
Follow the steps below to complete the memory creation from your documentation repository.
Step #1
It will prompt you if you want to create a memory from the current project git repository. Select yes.
Do you want to create memory from current project git repository? (yes/no) yes
Step #2
Next, it will ask you which directory or subdirectory you want to use for the memory. You can select the current directory or any subdirectory.
Enter the path to the directory to track (relative to current directory):
Provide the path relative to the root of the project directory that you want to use for the memory. E.g., src/content/docs, to use the docs directory in the src/content directory.
If you want to use the current directory, just press enter.
Step #3
Next, it will ask you which files extensions you want to track. Since we are creating a memory for docs, you can provide a comma-separated list of file extensions like .mdx,.md to track markdown files.
Alternatively, you can provide * to track all files.
Enter file extensions to track (use * for all, or comma-separated list, e.g., .md,.mdx): .md,.mdx
That's it, the memory setup is complete. It will create a setup file at baseai/memory/chat-with-docs in your current directory that tracks the git repository directory and file extensions you provided.
Step #4
The memory setup is ready and we can now create embeddings of the memory. With BaseAI, we can create embeddings by:
- Deploying the memory to the Langbase cloud
- Locally creating embeddings through Ollama
For best performance and results, we will deploy the memory to Langbase cloud. This will also enable us to use it in a chatbot web app.
Commit all the changes in your repository to git and run the following command to deploy the docs memory. Replace docs with the name of your memory if you used a different name.
npx baseai@latest deploy -m docs
When deploying the first time, it will ask you to login to your Langbase account and authenticate. Follow these instructions to authenticate quickly.
It will then deploy all the required files the memory to Langbase cloud, and create their embeddings. Your memory is ready.
Next time, whenever your documentation changes, you can run the above command again and BaseAI will update the memory with the latest changes.
Step #5
Now, we will create a pipe that will use this memory to create a RAG agent. We will call this pipe chat-with-docs. Run the command below to create the pipe.
In addition to the pipe name and description, it will ask you to select the memory to use. Select the docs memory you created in the previous steps.
npx baseai@latest pipe
It will create the pipe in your current directory under baseai/pipes/chat-with-docs.ts. It prints the path in the terminal. You can open the file and see the details. Here is how it looks like:
// baseai/pipes/chat-with-docs.ts

import {PipeI} from '@baseai/core';
import docsMemory from '../memory/chat-with-docs';

const buildPipe = (): PipeI => ({
	apiKey: process.env.LANGBASE_API_KEY!, // Replace with your API key https://langbase.com/docs/api-reference/api-keys
	name: 'chat-with-docs',
	description: '',
	status: 'private',
	model: 'openai:gpt-4o-mini',
	stream: true,
	json: false,
	store: true,
	moderate: true,
	top_p: 1,
	max_tokens: 1000,
	temperature: 0.7,
	presence_penalty: 1,
	frequency_penalty: 1,
	stop: [],
	tool_choice: 'auto',
	parallel_tool_calls: false,
	messages: [
		{role: 'system', content: `You are an Ask Docs agent. Provide precise and accurate information or guidance based on document content, ensuring clarity and relevance in your responses. You are tasked with providing precise and accurate information or guidance based on document content, ensuring clarity and relevance in your responses.

		# Output Format
		- Provide a concise paragraph or series of bullet points summarizing the relevant information
		- Ensure that each response is directly related to the query while maintaining clarity
		- Use plain language and avoid jargon unless it is specified within the query or document.

		# Notes
		- Prioritize accurate citations from the document when necessary.
		- If the document or section is not available, acknowledge the limitation and offer guidance on potential next steps to acquire the needed information.`},
		{
			role: 'system',
			name: 'rag',
			content:
				"Below is some CONTEXT for you to answer the questions. ONLY answer from the CONTEXT. CONTEXT consists of multiple information chunks. Each chunk has a source mentioned at the end.\n\nFor each piece of response you provide, cite the source in brackets like so: [1].\n\nAt the end of the answer, always list each source with its corresponding number and provide the document name. like so [1] Filename.doc.\n\nIf you don't know the answer, just say that you don't know. Ask for more context and better questions if needed.",
		},
	],
	variables: [],
	memory: [docsMemory()], // Connected docs memory
	tools: [],
});

export default buildPipe;
Feel free to use the prompts and settings above or customize them to your needs. Deploy the pipe to Langbase when you are ready to use it:
npx baseai@latest deploy
Your chat with docs RAG Agent is ready!
Step #6
You can try out your RAG pipe in the Langbase Studio playground. Navigate to Langbase Studio and open your chat-with-docs pipe. Ask questions about your documentation and see the answers.
Here is how it looks like for our RAG pipe we created for Langbase documentation:
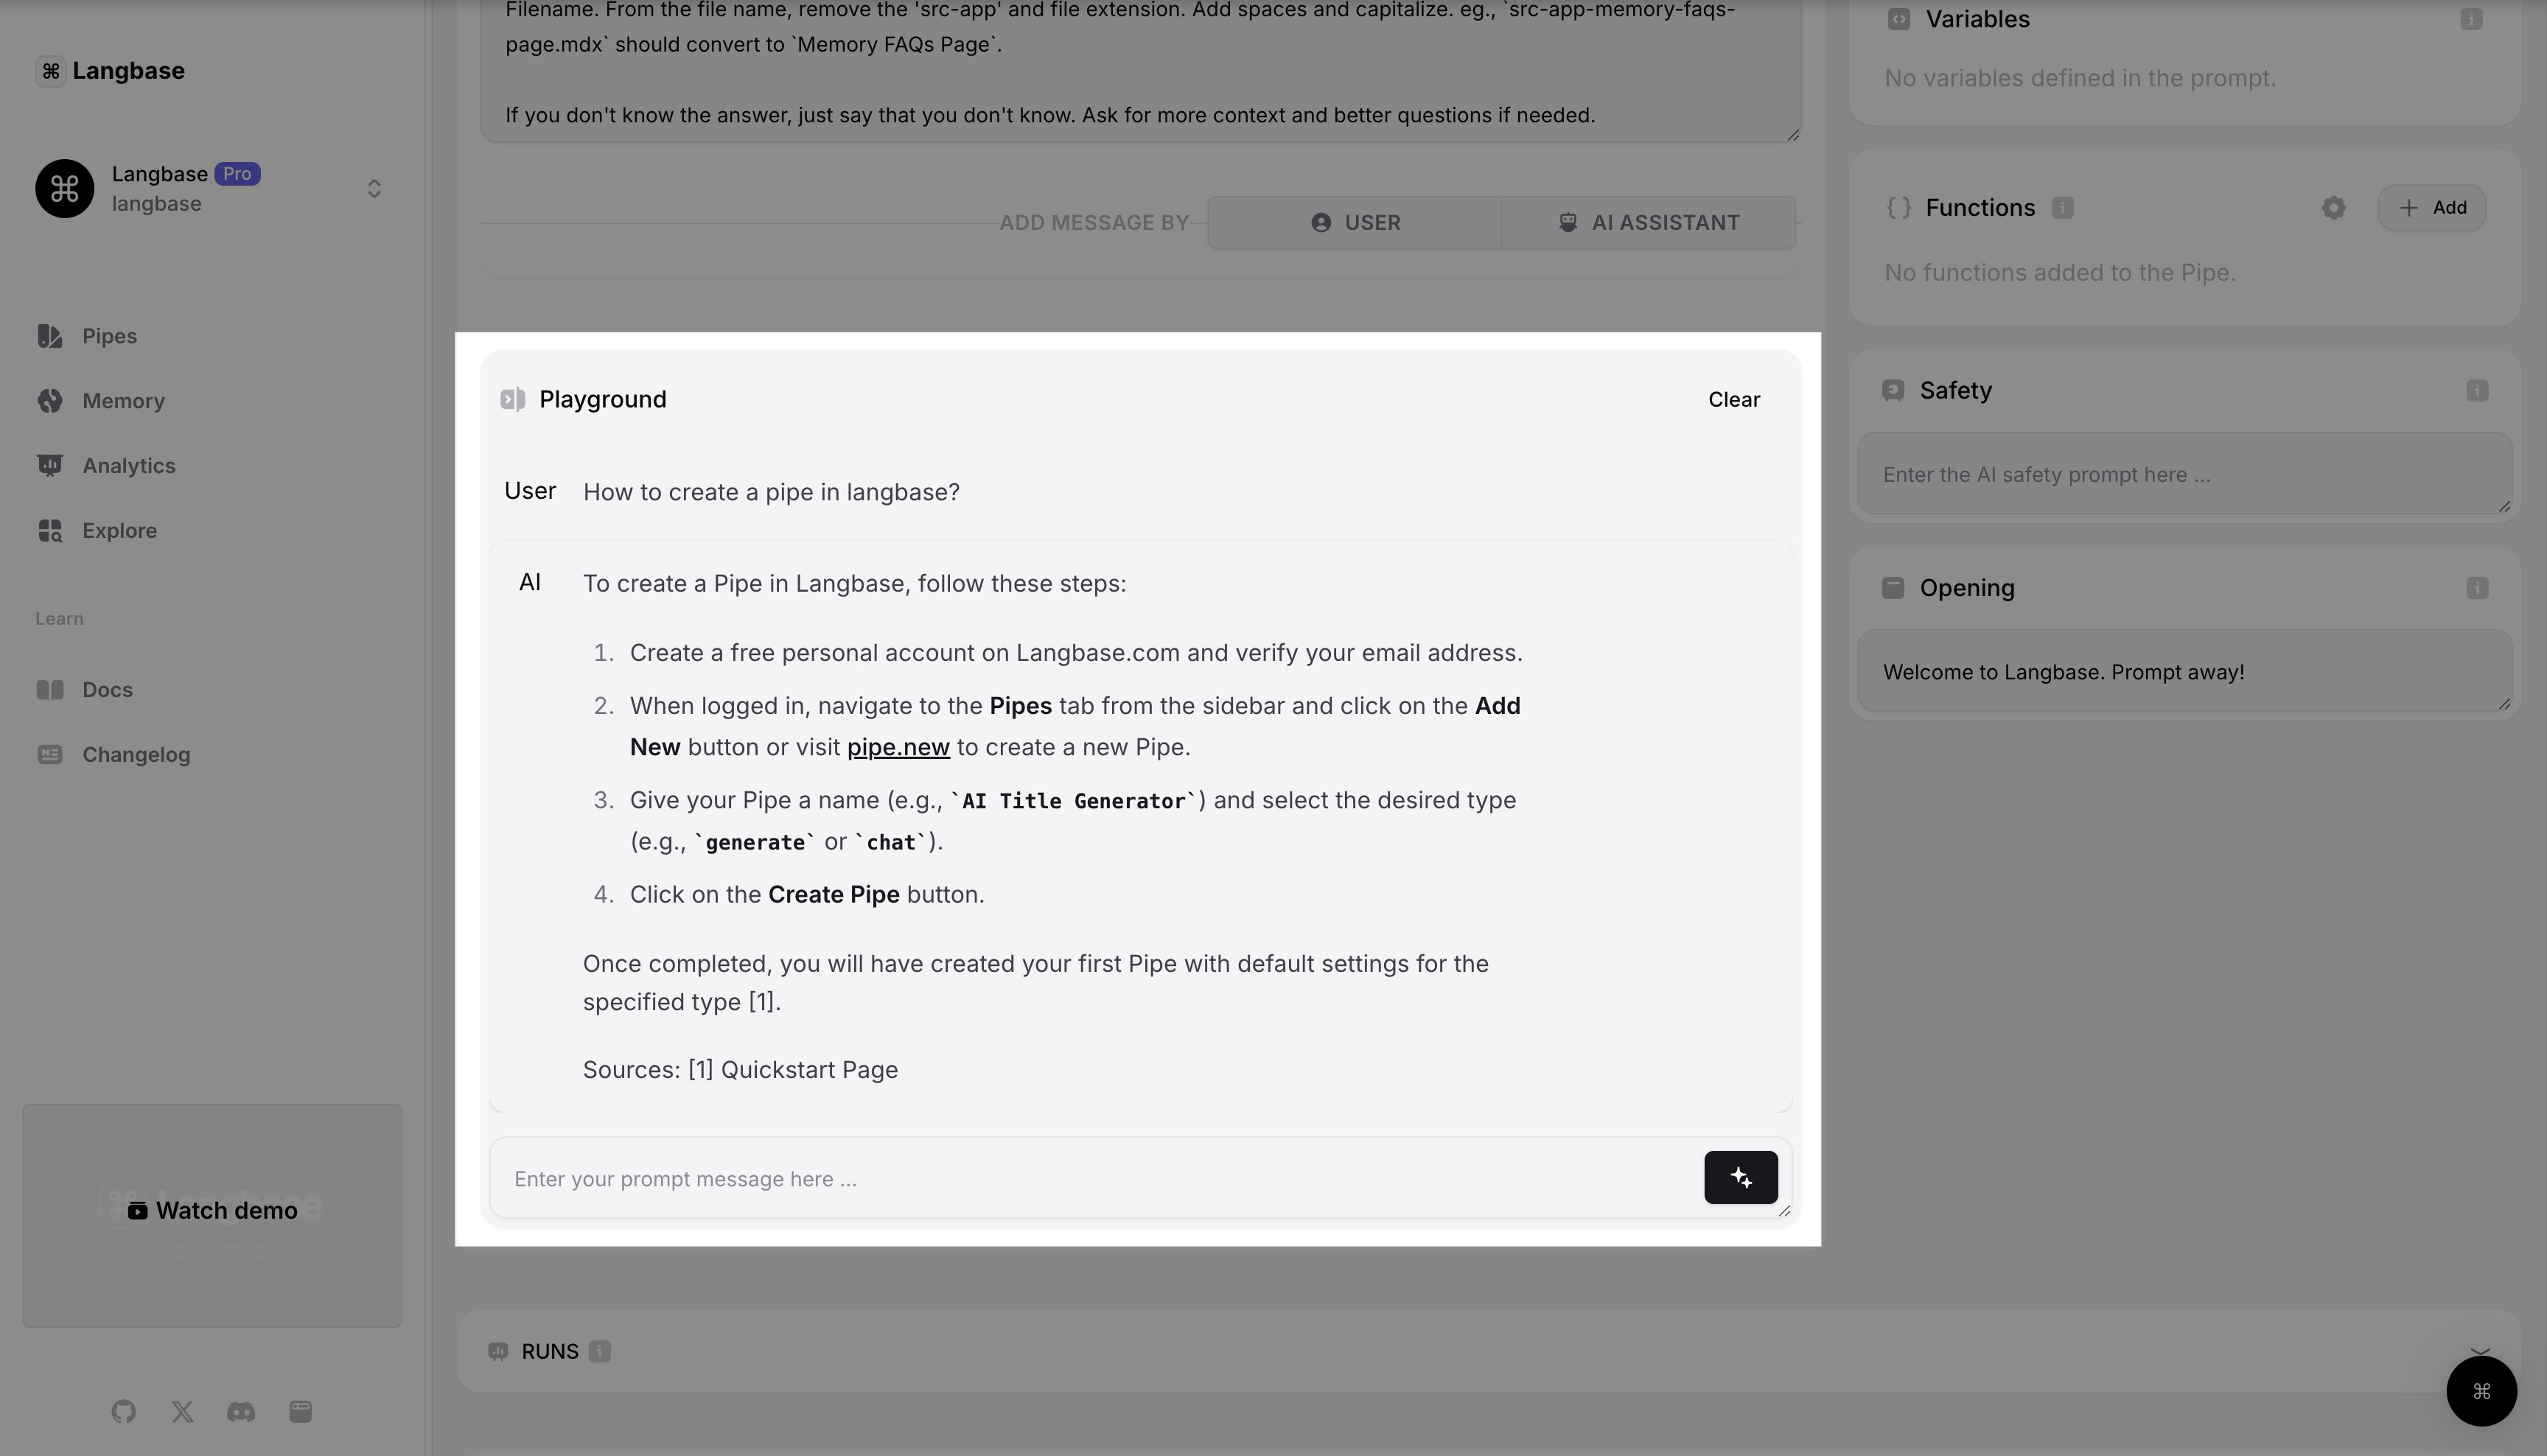
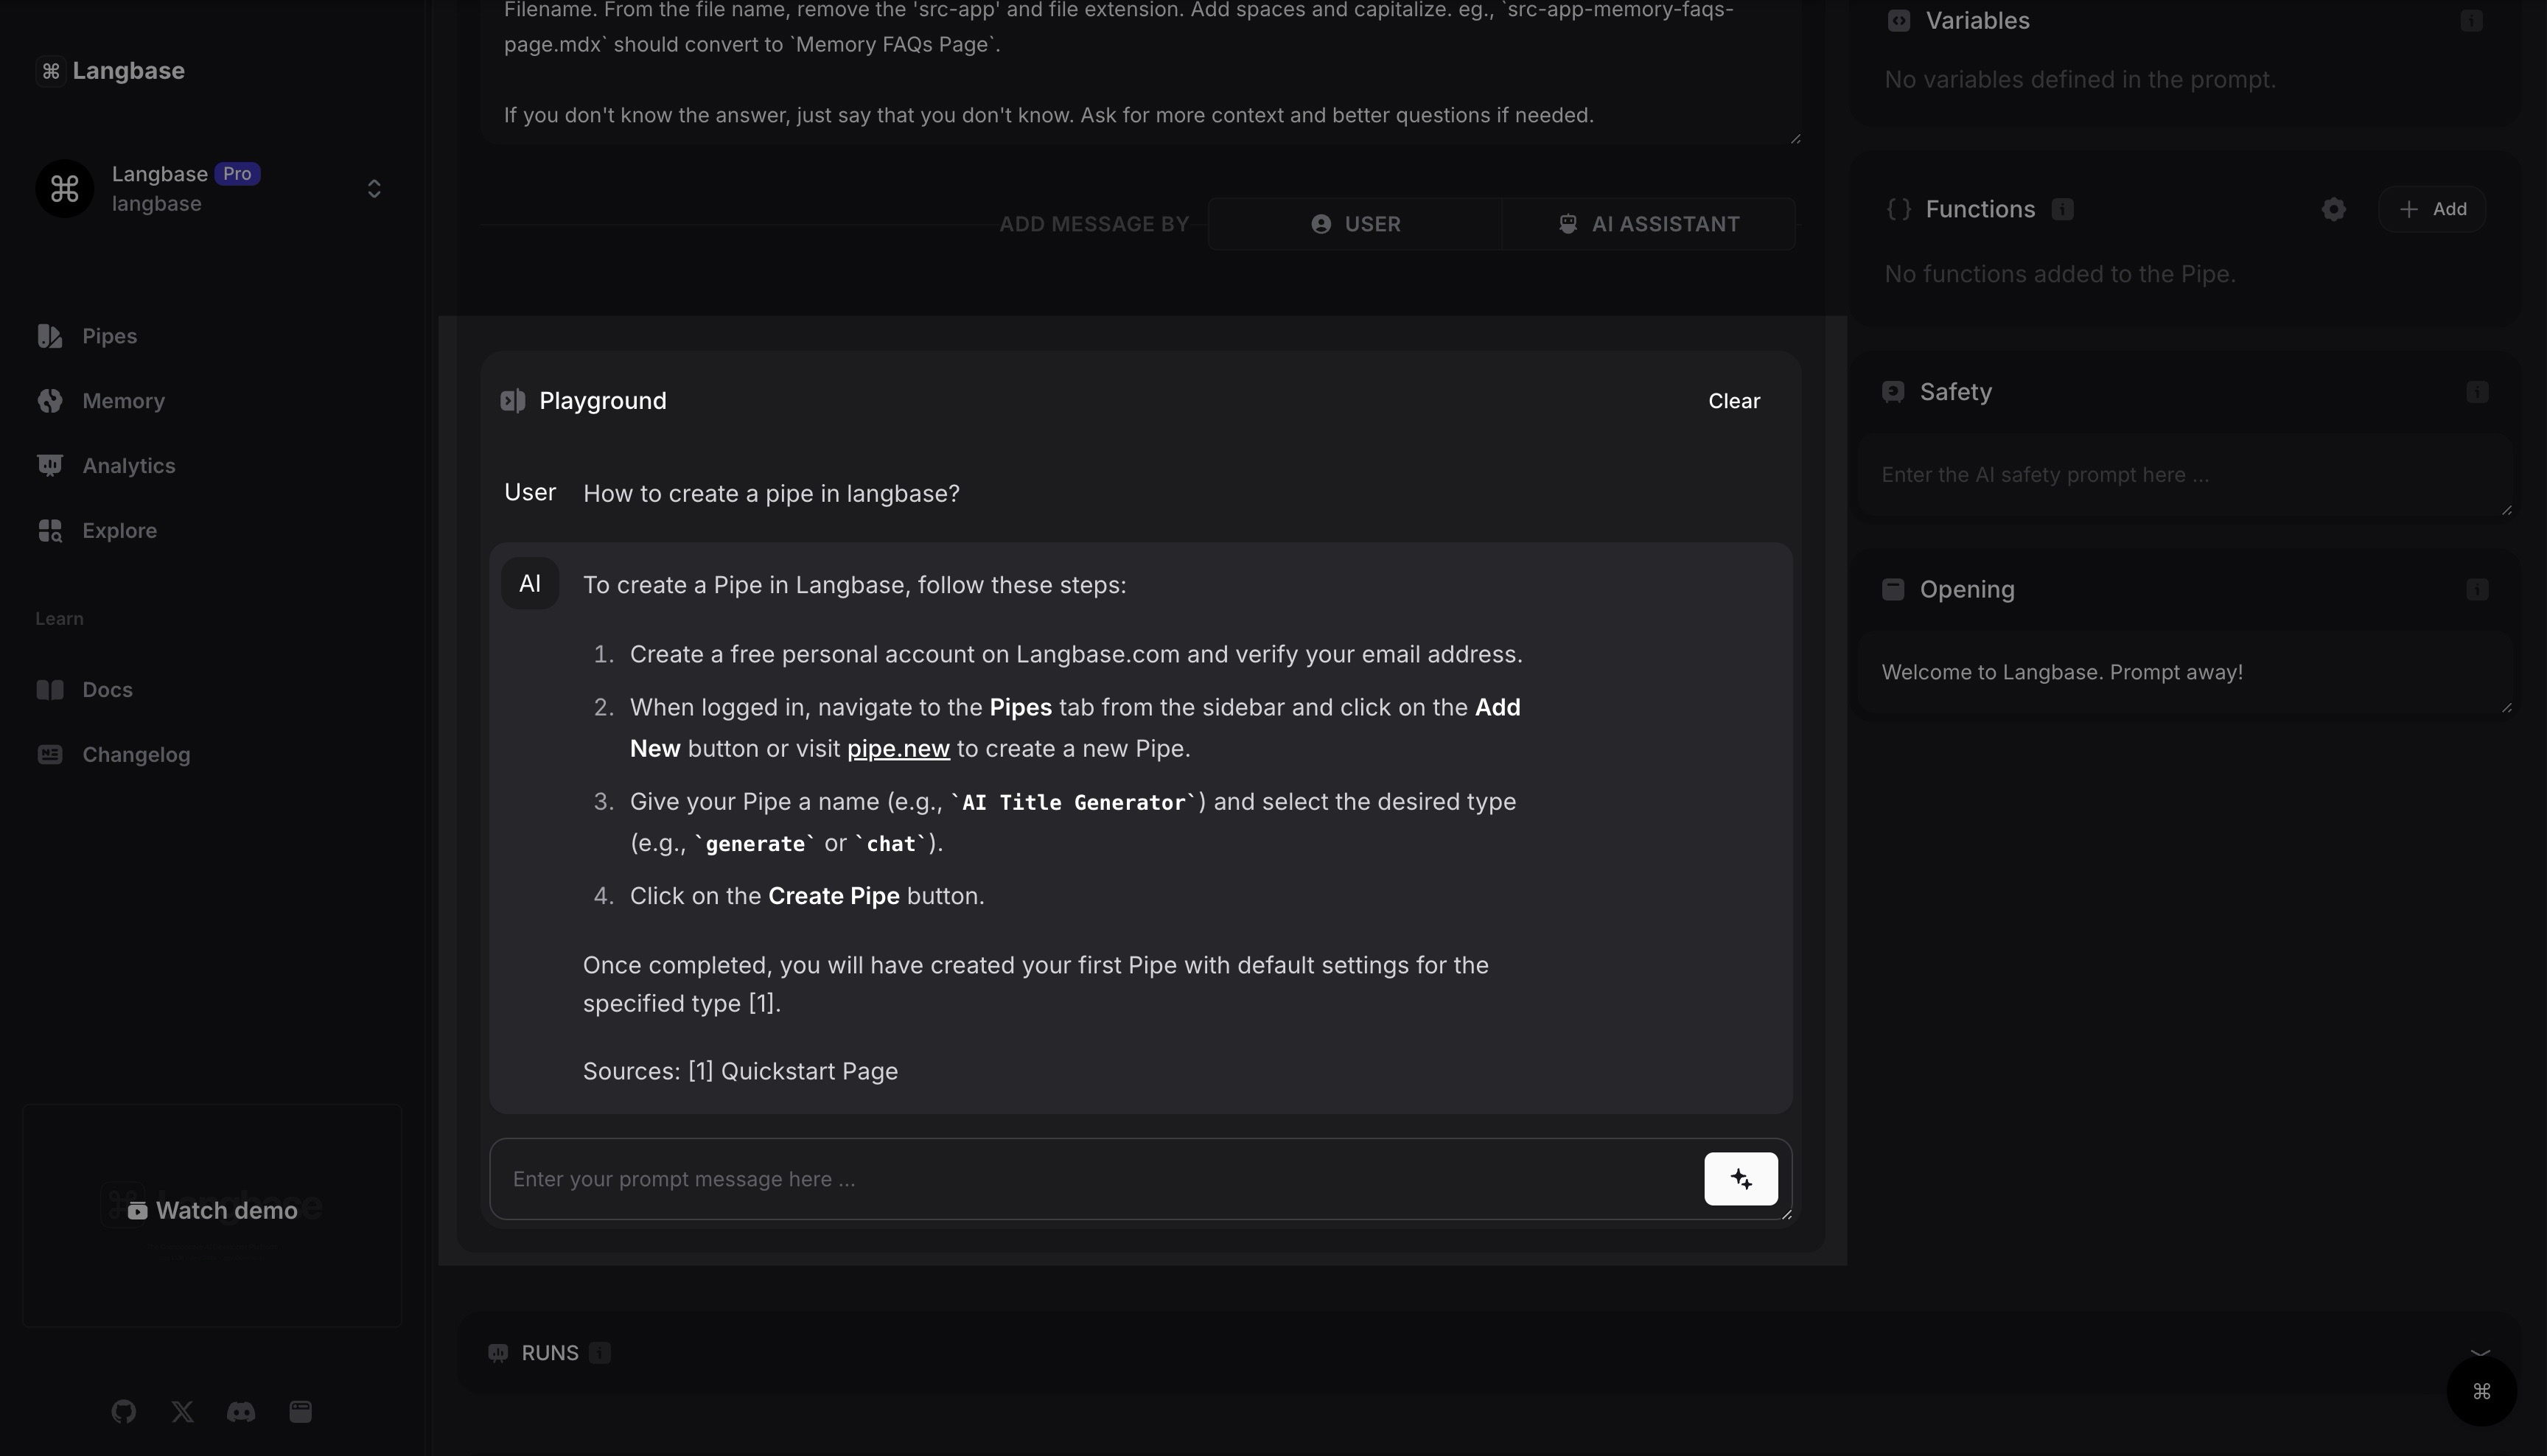
As you can see, it accurately answers queries by retreiving relevant chunks and sending them to the LLM i.e., Retrieval-Augmented Generation (RAG).
Step #7
You can integrate your pipe anywhere using the Langbase API. Here are a few ideas:
-
Chatbot Web App
Use our Next.js Ask Docs app example and integrate your pipe to create a chatbot webapp.
-
Discord/Slack Bot
Use our Discord bot example, integrate your pipe and offer an Ask Docs Bot to your Discord server members for querying your docs directly.
-
CLI
Build a CLI tool that uses your pipe to answer questions from your documentation.
For this guide, let's build a Chatbot Web App using our Chat with Docs RAG agent.
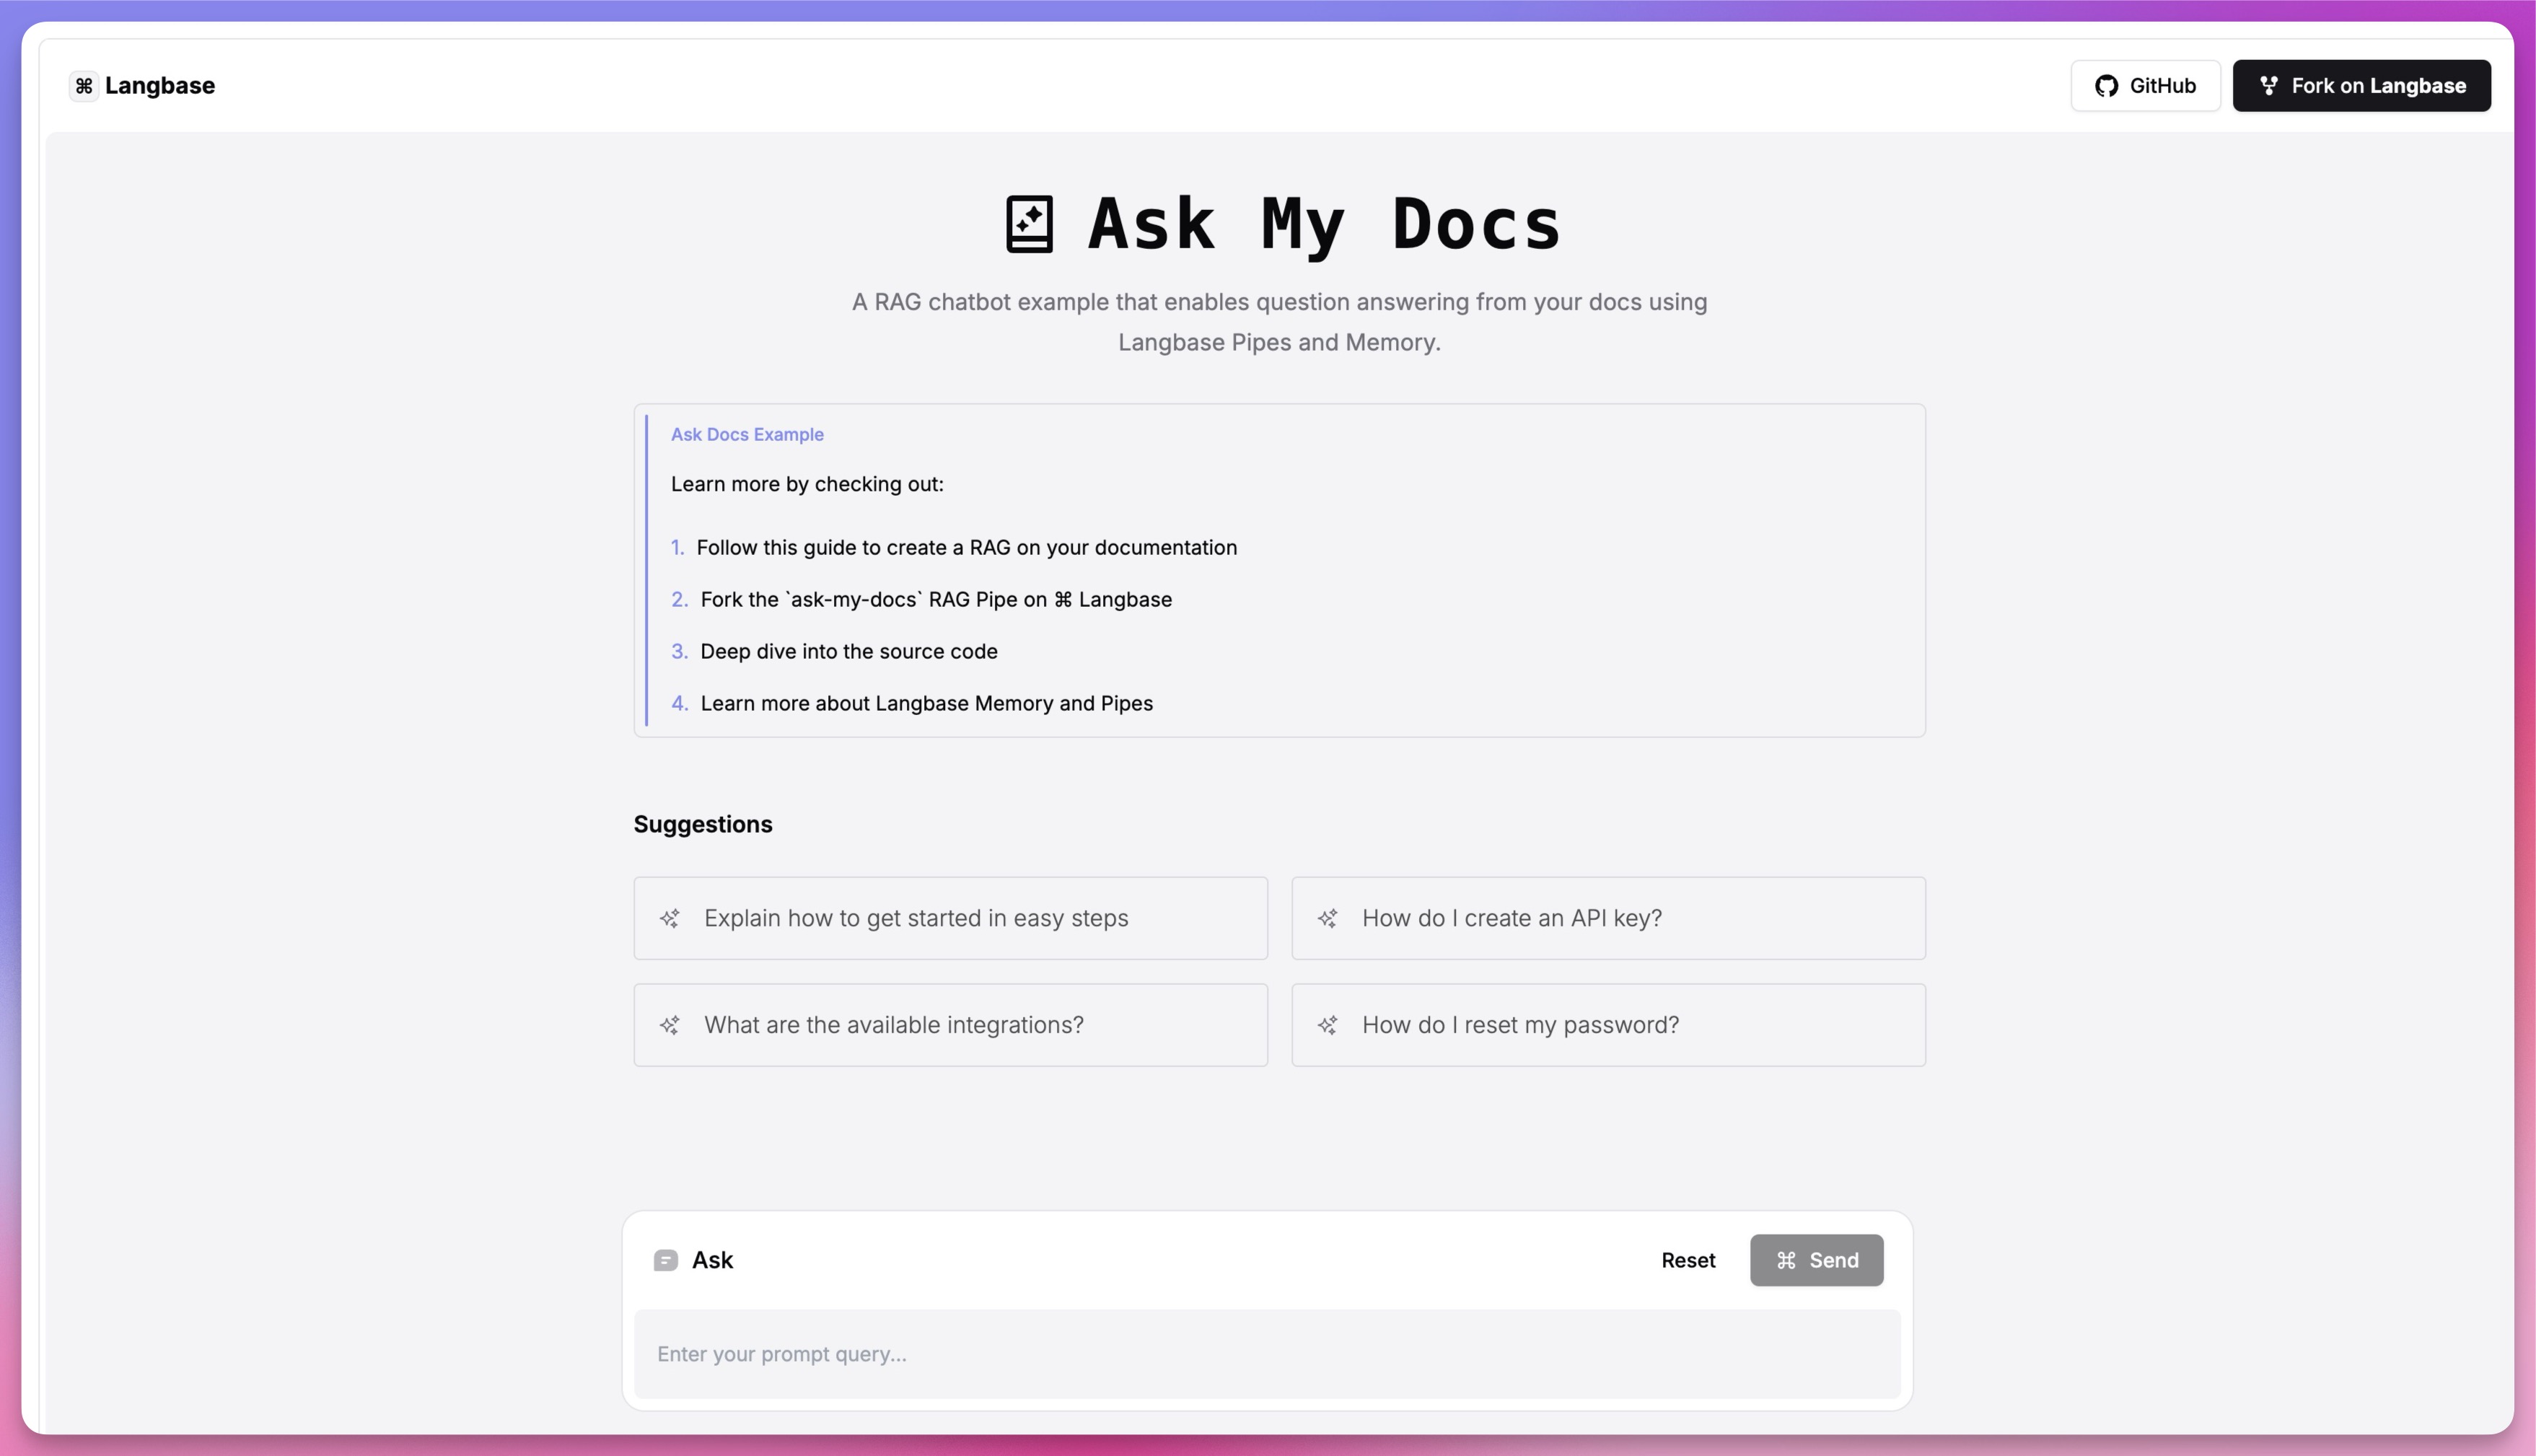
Step #8
Clone the Ask My Docs Example project to get started. The example app contains a single page with complete chatbot UI for your chatbot usecase.
Run this command to clone the example project:
npx degit LangbaseInc/langbase-examples/examples/ask-docs-rag
cd ask-docs-rag
Install the dependencies:
npm install
Step #9
Copy the .env.example file, rename to .env and add your pipe API key:
LANGBASE_PIPE_API_KEY=
To get your pipe API key, navigate to your chat-with-docs pipe on Langbase dashboard, open the API tab and copy the API key. Paste it in the .env file.
Step #10
Run the project using the following command:
npm run dev
Voila! Your chatbot web app is ready. It is that easy. Navigate to its link (usually on http://localhost:3000). You can now ask questions about your documentation and get answers from your RAG pipe in this app.
You can see the live demo of this project here, which we built for React Query Docs. Ask any questions about React Query and see the RAG chatbot in action.
By following this guide, you've leveraged Langbase and BaseAI to effortlessly build an automated and powerful RAG Agent on top of your documentation. The good thing is, it is highly composable and you customize it or even connect it to another pipe for improving the agent's quality.
Join our Discord community and share what you build and ask for support while building with Langbase.